How to make single location changes to your baseline network?
There are several changes you can make to your network in the baseline period. You can apply changes to a single location (location per location) - as described within this card - or in bulk, to a set of locations at the same time.
Within this article it will be clear what actions are possible, for which locations (own, competitor and/or local activity) and how you need to do it on the platform.
You can change the baseline network by
- Adding a location
- Removing a location
- Updating a location;
- Edit location characteristics
- Move the marker
- Update the traveltime
- Update the brand
- Update or confirm the passage and footfall configuration
General information
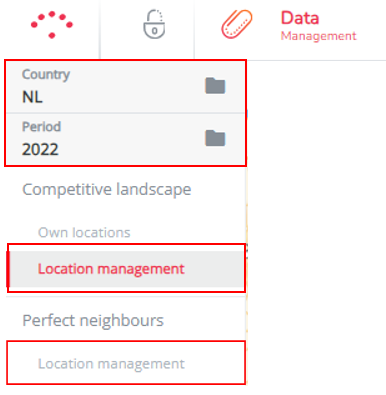
1. Updating locations is always country & period specific, so don't forget to first select the relevant country ypu are working on and the current state period.
2. Make sure you are on the right page:
- Changes within your own and the competitor network should be made on the location management page under 'Competitive landscape'.
- Changes within the Local activity network should be made on the location management page under 'Local activity'.
Important remark! Note that all changes made in the Data Management module are permanent and for all users.
1) Add a location
You can add new locations to your own network, to the competitor network and to the local activity network. Make sure to proceed to the right page to make the changes.
There are 2 ways to add a new location.
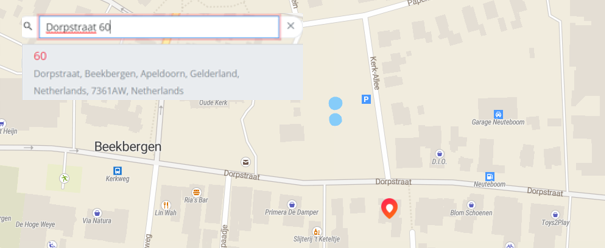
- By looking for the right place on the map and dragging & dropping the Add location marker to the right spot.
- By entering the address in the search bar on the map; select the right option in the list and click on the orange marker that appears on the map.
Next, a first pop-up window will open where you must indicate the type of location, select the correct brand and assign a name. If you're adding an own location, you also need to fill in a unique shop code. Confirm your choices by clicking on Apply.
In the second pop-up window, the location characteristics will be set to default values depending on the chosen brand. You can alter the values according to your information. Read also part 3.3 and 3.5 below if you want to update the traveltimes or passage and footfall if the automatic snapping is not correct (only for own and competitor locations). Once everything is indicated correctly, you can press apply at the bottom of the pop-up window to add the new location to the network. It will then appear permanently on the Location Management map and all other maps on the platform.
Remark for Local activity locations: the second pop-up window will display the estimated destination visitors (per year) of that location. This is a default value based upon RetailSonar knowledge. You should only update this if you have a better indication of the right value.
2) Remove a location
You can remove any location (own, competitor and local activity) by clicking on the location marker on the map and selecting the Remove button in the pop-up window.

3) Update a location
3.1) Edit location characteristics
Editing location characteristics is mainly for own and competitor locations. (For local activity, there is only one possible value to update: the estimated destination visitors/year.)
You can edit the location characteristics of a location by clicking on the location marker on the map. In the pop-up window that appears, you can alter all values within the white check boxes (e.g. surface, parking, accessibility, etc). The values within the grey boxes are auto calculated (based on the geographical position) and therefore non-editable. The car passage and footfall values are the only exception to this; to update them, read 3.5. Click on apply to confirm your changes.
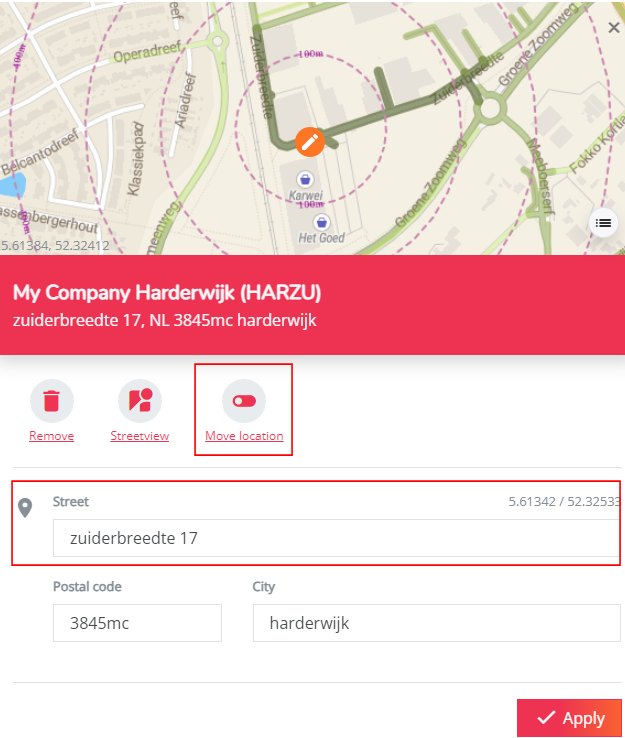
3.2) Move the marker of a location
You can move the geographical position of the location marker on the map (in case it wouldn't be correct or when the location was relocated very locally). This is possible for all location types: own, competitor and local activity. By moving the location from within the location pop-up, you don't have to re-enter all known location characteristics.
- On the large map, click on the marker of the location you want to move
- In the location pop-up, click on the 'Move location' button. The following message will appear: “Click on the map to update the marker location”.
- You can now use the minimap on top of the location pop-up to update the position of the marker. Hold your click to move around the minimap to look for the new geopgraphical position (only recommended for local relocations). The place where you single click on the mini-map will become the new geographic position of the location.
- The new marker will appear with an orange pencil sign. You will notice that also the address is automatically updated. Click on Apply to save the changes.
When you move the marker of a baseline location, the characteristics below will be recalculated. The reason is that these characteristics (partially) depend on the geographic position of a location. Note that not all of these characteristics are by default present in your application.
- Local activity cross-visit potential scores
- Urbanization
- Passage
- Travel times
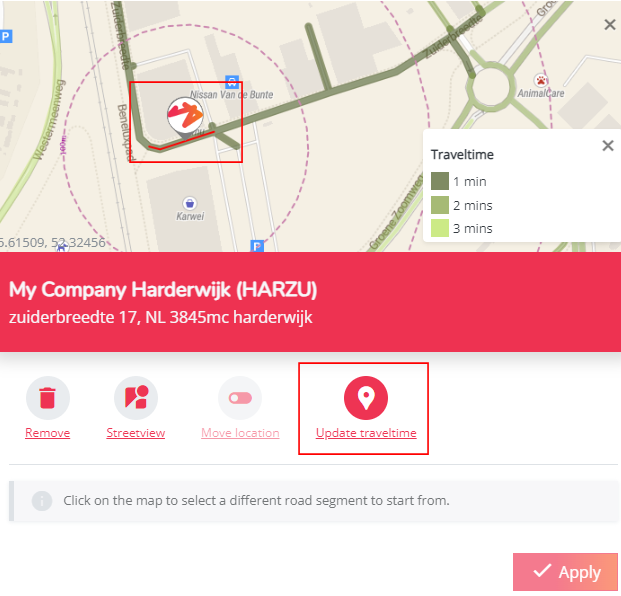
3.3) Update traveltimes
It could be that the marker of a location is geographically correct, but that the correct geographical location implies that the connection to the road network and therefore the traveltime snapping (needed for the right estimations of catchment areas) is not accurate. This could be the case for example for big shopping centers: by placing the marker geographically correct on the map, it could be that the closest road network (visualized by the 'connection road network' map layer) the locations connects to is the big parking lot. This means that it already takes more than 3 minutes to get off the parking lot, which implies an underestimation in catchment area for this location.
To address these kind of cases correctly, you can use the "Update traveltime" button to define accurate traveltimes while keeping the geographical location of the marker correctly. Be aware that this functionality is only possible for your own and competitor locations.
- On the large map, click on the marker of the location you want to check or update traveltimes for
- In the location pop-up window, click on the "update traveltime" icon. The following message will appear: “Click on the map to select a different road segment to start from”.
- Select the correct road (e.g. access route to the parking lot) for a new snapping of the traveltimes. A red line will appear on the selected road segment. The connection road network lines (see legend) will now change according to the new road connection.
- If the traveltimes seem better or more realistic after the change, click on Apply to confirm your changes.
Remark! If you update the location marker by clicking Move location button (see 3.2), the geographical position for the traveltime marker will automatically reset to the same geographical position.
3.4) Update the brand
You can also update the brand of a location. You can do this by clicking on the marker of the location and changing the type (depending on the usecase) and brand of the location.
Be aware that when you update the brand of a location, the location characteristics with default values that are brand dependent, will be updated to the default values of the new brand. You can, however, overrule this change again by providing your own value immediately and then saving your changes.
Important remark! Updating the brand of a location is not period-specific! So the brand will be updated in all baseline periods and simulations.
3.5) Update the passage and footfall estimation
This is only possible (and relevant) for own and competitor locations. Follow the steps as described in point 3 within this article: Confirming or updating the default car passage and footfall for locations. Be aware that passage updates are only possible for one location at the time.
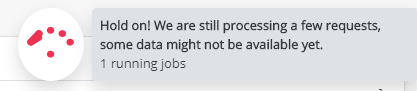
NOTICE OF RECALCULATING RESULTS
Whenever you made changes to the baseline network and you go back to work in the other modules, you will see a notice in the bottom right corner that warns you that results are being re-evaluated. Due to changes in the location network, the baseline period will be recalculated as well as all simulations that are based upon this baseline period. Please be aware that results are only reliable/available when this message appears, meaning that the model has been re-calculated. It is therefore best practice to make as many baseline network changes as needed all at once within Data Management.
Note that simulations that are based on an updated baseline period will only be recalculated upon re-loading in the Location Location Planning module first.